Tamiya's 1/48 Brewster Buffalo
- Mido
- Apr 20, 2024
- 12 min read
Updated: Apr 22, 2024
It will be well into 2024 by the time you're reading this, but Happy New Year nonetheless! That's because this build was started on January 1st for three important reasons:
It is good luck to start a new kit according to @PlaneThought41
I will meet my resolution to build from the Stash
It is the start of the #JFFScaleModels group build, #JFFLetterM edition, by @rheumatoidman taking place on X (formerly Twitter)

Item 3 is particularly significant. It's the first group build I have ever taken part in. So let's unpack that. A group build is when modelers decide to build along a given topic, usually with a set deadline. The "JFF" in this group build stands for "Just For Fun", and is a reaction to unsolicited post-build criticism that is found in certain corners of the modeling community.
From what I've seen, those taking part in JFF range from beginner to highly experienced. Importantly, and as the JFF suggests, I've only witnessed positivity and modeler camaraderie. Think modelers encouraging modelers. Truly great stuff! Bravo @rheumatoidman!
Lastly, "LetterM" is just that. Any kit with an "M" in the name, related adjective, etc. The M in TaMiya is what allowed this Brewster Buffalo entry. Oh, and the deadline? That's April 30th. Plenty of time for this slow builder!
In keeping with the JFF spirit, I'm not going to agonize over minute historical details. I'm also not going to go overboard putting a ton of work into areas of the kit that won't be seen. I've done enough of that recently on a few Wildcat builds and a Panzer I interior. It's not that I'm cutting corners (I am adding an Eduard PE cockpit after all), I'm just maximizing JFF!
Enough preamble, let's get into things already.
The plane
Most aircraft participating in World War II come with a "good" or "bad" reputation. I've come to learn that the Buffalo is simultaneously neither and both, yet comes with the "bad" descriptor firmly attached. As I researched, it became clear to me that the Buffalo highlights the rapid pace of aircraft design in the 1930s and contextual advantage while in combat.
So, "bad"? Indeed sometimes.
"Good", no "great"! Yes, once.
In 1935, the US Navy began a design competition to replace the Grumman F3F biplane fighter aircraft. The two main entrants to the competition were Brewster Aeronautical Corporation's XF2A-1 Buffalo and Grumman's XF4F-1, a predecessor to their famed Wildcat. Brewster's design was a monoplane, while Grumman's was a biplane. But by that time, the writing was on the wall for biplanes and Brewster's design won the competition.

When designed, the Buffalo had a cocktail of advanced features. It was an all-metal construction, save for the fabric control surfaces, flush-riveted, used powered retractable landing gear, and I'll mention again, was a monoplane. It was also one of the first aircraft to go through a rigorous wind-tunnel testing program. Refinements from this program led to a 10% increase in top speed.

Early versions of the Buffalo were powered by a Wright R-1820-32 Cyclone engine and armament was one .30 in and one .50 in caliber gun in the nose, and two more .50 in mounted in the wings. In June 1938, the Navy inked a contract for 54 of these early Buffalos, designated F2A-1. But after operational testing, additional navalization (read added weight), and production issues, only 11 were delivered. The remaining portion of the order was exported to the Finnish Air Force, modified, and designated Model 239.


After refining the Buffalo's design, and improving the engine, the US Navy ordered another 43 under the F2A-2 designation in 1940. According to the famous Pappy Boyington:
"the early models, before they weighed it all down with armor plate, radios, and other equipment... were pretty sweet little ships. Not real fast, but the early F2As... could turn and roll in a phone booth"
But as Boyington alludes, there were more emergent features in aircraft design to bake in. These included fuel storage and self-sealing fuel tanks in the wings, and armor protection for the pilot. Good in theory, but overly penal to weight and performance characteristics. By late 1940, the Navy realized the Buffalo's airframe had reached its limits and aircraft were relegated to second line fighters for the United States Marine Corps.

Yet the procurement story doesn't end there. In Jan 1941, the US Navy ordered the third and final wave of 108 Buffalos, designated F2A-3. By many accounts this order was about preserving industrial base rather than increasing lethality of the fighting forces. File this in the Buffalo's "bad" column.
Editor's note: Brewster & Co. was a horse carriage manufacturer for over 100 years. After World War I that they re-organized as Brewster Aeronautical Corporation and began to build aircraft components. Their first in-house aircraft design didn't happen until 1934. And if I understand a passage from The Cactus Air Farce: Air War Over Guadalcanal correctly, Brewster's production capability was limited to an antiquated 19th century factory split over two floors. So yea, Buffalos were hoisted up and down, and had their final assembly made offsite. Not great! By April 1942, Brewster was seized by the Navy over mismanagement and was forced to build Vought's famed Corsair under license. Corsairs, you say? Not a bad outcome!

While the US Navy was receiving Buffalos, so were foreign operators. In fact, nearly 350 of the 500 Buffalos produced from 1938 to 1941 went overseas in various export configurations. This is where the Buffalo's legacy gets very complicated.

High level notes suggest that against Japan's relentless Pacific drive in 1941 and 1942, Buffalos achieved parity at best, and were slaughtered at worst:
Malaya - Buffalos of of the Royal Air Force could duel with Japan's Nakajima Ki-27 but were outmatched against the Nakajima Ki-43
Burma - RAF Buffalos staged an intense fighting retreat against Nakajima Ki-27 over Rangoon, Mingaladon, Magwe, and Chiang Mai. The 6 surviving Buffalos withdrawn to India quickly became training aircraft
Netherlands East Indies - After modifying loadout to minimize weight and improve handling, the Dutch fought to near equality with Nakajima Ki-43 and Mitsubishi A6M Zeros
Midway - US Marine Buffalos were diverted from Wake Island to Midway Atoll and sparred with Mitsubishi A6M Zeros. Despite a heroic defense during the Battle of Midway, most were shot down

Now we must remember context. In all the Pacific campaigns noted, Buffalos were faced against a superior fighting force in training, material, and morale. Simply put, Japan was unstoppable in 1941 and early 1942. No aircraft could have turned the tide. For now, file all this in the Buffalo's "bad" column as the Buffalo is associated with strategic defeat.

However, in Finnish service along the Finnish-Soviet front during the Continuation War, Buffalos were stars. On that front they claimed an extraordinary 26:1 victory ratio. Analysis suggests that aircraft BW-364 achieved 42.5 kills by all pilots to have flown it. If true, that would make this airframe the most successful in history. Finnish ace, Ilmari Juutilainen, responsible for 28 of those victories, 34 in Buffalos, and 94.5 victories overall, called it a "Gentlemen's touring plane." It certainly didn't hurt that some of these victories came against Polikarpov I-16s that were designed several years prior to the Buffalo. Enter this all in bold and underline heavily in the Buffalo's "good" column.

That leads me to another aspect of context. The 1930's saw such a rapid pace of aircraft development that design advantages lasted mere months. Therefore, I don't think it's too surprising that this table of aircraft first flight's aligns neatly with anecdotes from the Buffalo's service history.
Aircraft | First Flight |
Polikarpov I-16 | December 1933 |
Nakajima Ki-27 | October 1936 |
Brewster F2A | December 1937 |
Curtiss P-40 | October 1938 |
Nakajima Ki-43 | January 1939 |
Mitsubishi A6M | April 1939 |
In summary, the Buffalo is a controversial and much maligned aircraft in World War II aviation circles. But I think that assessment lacks nuance. In my humble opinion, the evidence suggests that Pacific Buffalos were likely operating at design parity or inferiority against Japanese aircraft, and doing so in highly adverse strategic conditions. On the other hand, Finnish Buffalos, fighting against Soviet aircraft, likely enjoyed considerable design superiority.
So what do you think? Was the Buffalo really "bad"? Let us know in the comments!

The kit
According to scalemates.com, this Tamiya kit was first tooled in 1974. Several versions were released over the years and featured different decals, and maybe even a working propeller. The bulk of the parts are on 2 sprues, and several parts won't be used because the kit gives you an option to build an F2A-2 variant, or the B-339 export variant. Of importance to some, the mold is a combination of raised and recessed panel lines, and the canopy does not allow the open position. Two figures, one US Navy, and one RAF, a great looking set of decals, and a set of masks round out the stock offering. Unfortunately the masks are not precut. Nonetheless, given the amount of glass on this bird, any head start on masking is appreciated. Overall, the in-box contents look great to me!

Keen observers will note that I set foot into the aftermarket and procured an Eduard photoetch cockpit set. Don't misunderstand, I think the kit offers plenty of cockpit detail, especially for a 1974 tooling, but I wanted to practice my PE skills as I gear up for further builds.
Could the PE spoil the JFF? Maybe. Time to find out.
The build
I started this build with the landing gear. The gear struts are molded in one piece which is good from a finished model strength and stability perspective. However, the gear struts and wheels contained unpleasant seam lines that had to be scraped away and sanded. It was a bad start to the kit. Fortunately, this was not a harbinger of things to come. The rest of the kit had minimal cleanup requirements.
The cockpit has a few ejector pin marks that could be filled. I decided I wouldn't bother. Once things are buttoned up, it's unlikely they will be seen. And plus, this is a JFF build, and I didn't think spending the time addressing these hard to see imperfections would be fun!
The Eduard PE set required minor cockpit modification. I used a hobby knife and pair of nippers to remove a few areas of plastic that would be replaced by PE. I freely admit that I didn't do the cleanest job. I added a dab of Tamiya's Surface Primer to fill in the most egregious gashes, and quickly moved on. I love JFF!


I hand painted the cockpit with Vallejo's Metal Color Duraluminium (77.702) on top of Black (70.950). As for the chosen color, I've read conflicting information about the Buffalo's cockpit being aluminum or zinc chromate. In general it appears to vary based on specific variant, and year. Instead of spending time solving that mystery, I simply went with what I thought will look cool, and something to roughly match the pre-colored Eduard parts.

I've only started to use the Metal Color line, and I have nothing but nice things to say about brush application and resulting appearance. Unlike other Vallejo paints, they are ready straight from the bottle. When the cockpit painting was complete, I went ahead and brushed on Metal Varnish (77.657), and then applied a home made oil pin wash.
Once the cockpit was prepped for PE, I knew it was only a matter of patience, proper glue, tweezers, magnification, and breaks(!) to get things in good order. I must have sat down 4 or 5 times do do the PE in the cockpit. Each session was no more than an hour, and I usually only did one session per day. While I chose to add Eduard's PE set to this 1974 Tamiya kit, I must reiterate that it's not necessary. The kit already has nice cockpit parts.


To get a little more color into the cockpit, I experimented with Chipping Medium (73.214) on the interior oil tank(?), which also functions as the cockpit floor. I've never used a chipping fluid product before, but I wanted to establish a baseline expectation before trying in earnest on future builds. Plus if things went sideways, it will be hard to see. JFF all day! I love this!

The fuselage halves and wings all had very good fitment, the engine tucked away easily, but the cowling to fuselage wasn't particularly good. Bottom line, if you spend a little time tidying up the key areas, you should end up with a solid base build for priming.

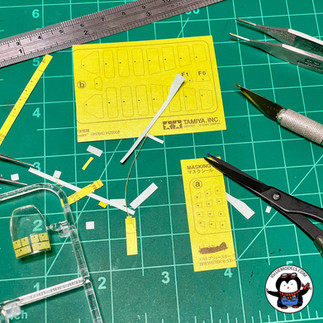
As noted in the kit section, the Buffalo has a lot of glass. It has a traditional cockpit canopy and a ventral window. Both are greenhouse style. To cut the kit's included masks, I used a metal straight edge, hobby knife, and Tamiya's Decal Scissors. I also used a pair of good quality tweezers to place the masks on the canopy. It is important to work slowly here. If you do, you shouldn't have trouble. Canopy glue was used to secure the clear parts to the fuselage and Vallejo's Plastic Putty was used to fill in some gaps.


Painting
This build will join my Pacific aviation build series. As such, I wanted the Buffalo to document the US Navy's grey paint scheme that existed between the "Yellow Wings" and blue-grey/light gray paint schemes.
I started by priming the model with Vallejo's Grey Surface Primer (73.601). Then I pre-shaded the panel lines with Tamiya's Dark Grey (XF-24). Finally, I painted the monochromatic scheme with Vallejo's Model Air M495 Light Grey (71.298). I got this specific shade of grey from Vallejo's Air War - US Navy & USMC colors 1940-1945 set (71.157). I look forward to exploring more of this set's colors on future builds.


Decals
Lucky for me, there were only a handful of decals for my chosen scheme: VS-201 aboard the USS Long Island (AVG-1). I used Tamiya's Clear (X-22) to gloss varnish the model and used Tamiya's Mark Fit Strong, mostly out of habit, to help the decals "bed-down". After drying for a day, I gently sanded the decals with a sanding sponge, and also gave them a very light mist with M495 Light Grey. These two steps help blend the decals into the model and are a great way to boost your decal game. I concluded the decaling process with another coat of Tamiya's Clear.


Weathering
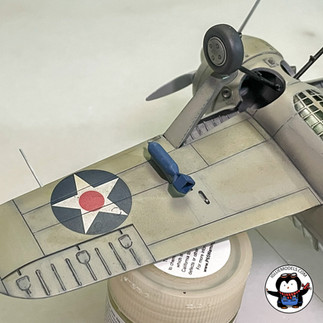
I decided to keep weathering to a minimum because this is both a pre-war and a JFF build. As I've confessed before, weathering is not my most enjoyed part of a project. I started with Tamiya's Dark Grey Panel Line Accent Color to make the few recessed panel lines pop.


Next I added an oil dot filter for subtle visual interest. But before I could do that, I had to do something crucial: splice in another varnishing layer with Vallejo's Satin Varnish (70.522). Here's why:
Mineral spirits are required to work an oil dot filter, but mineral spirits will also undo my enamel-based panel lining if not careful. An acrylic barrier layer was needed
Further, oil dot filters are better applied over a slightly rougher satin finish than the Tamiya Clear gloss one used with the panel lining technique. I used Vallejo here because they formulate a satin one and it was on hand. Curiously Tamiya does not make a satin or semi-gloss varnish out of the bottle, although one can be mixed from products in their acrylic range

Rounding things out, I used Tamiya's Weathering Master products to add soot at the gun ports and engine exhaust. To keep with the pre-war theme, I omitted chipping effects as a storytelling device.

Last details
Finishing an aircraft is full of small tasks. I find these two products by AK to be particularly helpful and efficient. The first is their Anti Slip paste. All you need to do is mask off the area, and use a sponge to dab it on until you achieve the texture you desire. Different grit sizes are available. The next is their elastic rigging line that I use for antennae. It easily stretches so that you can achieve a tensed antenna and adheres with standard CA glue. Nothing is worse than a saggy antenna! Several thicknesses are available.


Troubleshooting
I wouldn't be a credible builder/blogger unless I showed my mistakes. This build featured a scratched frontal canopy pane and overspray on the canopy interior.
Impressive. I know.
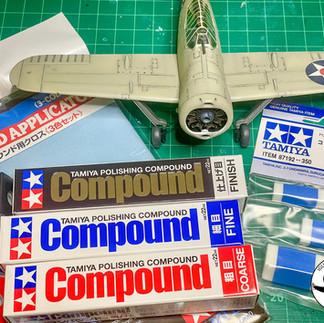
To remedy the scratch, I sent out an emergency airdrop request for Tamiya Compounds. I hadn't used them before and was a little nervous to try them so late in the build. To my delight, they worked extremely well. All I did was take a Tamiya Craft Cotton Swab and made gentle circles with the compound on the scratched area. After working it on, I simply wiped the compound away with water. Incredible product!


The cockpit overspray was a real pain. It was too late in the build to remove the canopy for easy cleaning. Remember, I had to use putty to fill canopy gaps. I feared that redoing this work would ruin the build's finish. Unfortunately, the only way into the cockpit was to remove (read break) the aiming device. Now that an entry point was established, what tool could be used to wipe away the overspray? I took to the JFF community for advice. and they didn't disappoint. One commenter suggested I take a fishing hook. Well, I didn't have that. But I did have a staple. And pliers. And UV glue to "pad" the end. In I went. I emerged after what seemed like hours with a passable canopy.


Final thoughts
This build is really about JFF! What a great community. It was such a pleasure to get involved with everyone, share tips, and get support and encouragement as the build progressed.
As a subject, the Buffalo showcases an important part of USN aviation, Pacific theater aviation, and holds an enduring legacy with the Finns. To say it has a mixed performance record is an understatement. On the outset of the build, I was not physically drawn to the Buffalo, especially when viewed against the sleek lines of the Zero. However, it grew on me. I've decided it is endearingly chonky. To my surprise, many fellow modelers in the JFF community agree. Apparently they love the chonkiness!
With this JFF build wrapped up, and a realization that builds can be done in a mere (I told you, I'm slow) 4 months, I'm excited to see where the JFF group build heads to next!
Beep. Beep. Incoming tweet:
JFF is back starting May 1st, 2024 with #JFFGreen. Only rule: paint something green by August 31st, 2024.


Total time spent was near 42 hours.
Thanks for reading,
Mido
Contact the author: mido@igluemodels.com or on IG, Twitter, and Bluesky @igluemodels
Sources, information, and other useful links
The Cactus Air Farce: Air War Over Guadalcanal by Eric Hammel & Thomas McKelvey Cleaver