Tamiya's R35 featuring AK Interactive's Real Color Markers

The Tamiya Renault R35 is exactly the kind of kit I want for a relaxed armor build. Small, interesting, well-engineered, and just unusual enough to stand out on the shelf. The real attraction, though, was the camouflage. French armor from 1940 wore some wonderfully odd and complicated multi-color schemes.
But I'm a painfully slow, time-constrained builder. Not a good combination! So I decided to see whether AK Interactive’s Real Color Markers could handle the job. Could they make a five-tone French camouflage scheme quicker, easier, and more fun, or would they turn into a gimmick once the real painting started? This build became a test of both the kit and the markers, and, as it turned out, a reminder that trying a new tool can change the whole feel of a project.

The Renault R35
The Renault R35 takes center stage when discussing French armor in the 1940s because it was the most numerous and emblematic of France’s interwar doctrine. Compact, heavily armored, and designed for a very specific battlefield role, the R35 became both a symbol of French industrial ambition and a casualty of rapidly evolving warfare.

The Renault R35 was conceived as a light infantry tank, optimized for protection and simplicity rather than speed or firepower. It weighed nearly 11 tons, had a two‑man crew, and featured up to 43 mm of cast armor, making it one of the best‑protected light tanks of the mid‑1930s. Its armament consisted of a 37 mm SA 18 gun, adequate for suppressing infantry and machine‑gun nests but ineffective against modern armor, and a 7.5 mm MAC31 coaxial machine gun. It was powered by an 82 hp Renault V‑4 engine and could reach speeds up to 20 km/h.
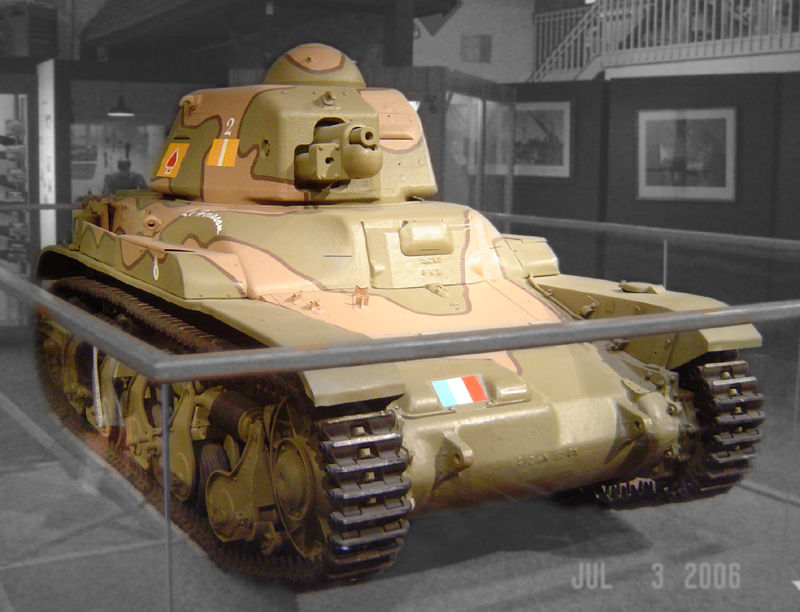
The hull was constructed from three large cast sections bolted together, a design choice that simplified production and improved structural strength. This emphasis on manufacturability allowed France to build over 1,500 R35s by June 1940.

The R35 was born from a long‑standing requirement to replace the aging Renault FT, the iconic World War I tank still serving in large numbers. French planners envisioned a “char d’accompagnement”, a cheap, mass‑produced infantry support tank that could accompany foot soldiers in deliberate, methodical assaults. Because most French divisions were not motorized, the Army prioritized armor and survivability over speed.
The R35’s development also reflected France’s belief that future wars would resemble the trench‑dominated struggles of 1914–1918. As a result, the tank was optimized for breaking fortified positions, not for mobile, independent armored operations.

French doctrine divided tanks into infantry tanks and cavalry tanks. The R35 belonged firmly in the former category. It was assigned to infantry divisions, where it would advance at a walking pace to suppress strongpoints and protect troops. This doctrinal choice meant the R35 was not concentrated in large armored formations, limited the supposed need for radios, and was never intended to fight enemy tanks in maneuver warfare.

The R35 was effective within its infantry support role. But in the fast‑paced, combined‑arms warfare that characterized German military operations in 1940, it was outmatched. Its slow speed, weak gun, overworked commander, and doctrinal misuse rendered it ineffective against modern mechanized forces. In the end, the R35 was not a bad tank, it was simply a tank built for a war that no longer existed.
The 21st Combat Tank Battalion (21e BCC)
Unfortunately, there is not much information that I can find on the R35 model's unit, the 21st Combat Tank Battalion (21e BCC). The most comprehensive documentation I found comes from this website chars-francais, which I encourage you to visit. There are some great photos!
But to give the briefest of summaries here, in June 1940, the Battle of France was entering its final phase. The battalion was part of France’s scattered armored reserve, equipped primarily with Renault R35 infantry tanks, and committed piecemeal as German breakthroughs widened across the front. By mid‑June, with the front collapsing and encirclements mounting, many R35s were abandoned due to mechanical breakdowns or lack of fuel rather than destroyed in combat. When France signed the armistice on 22 June 1940, the 21e BCC was effectively shattered. Its actions, though ultimately unable to alter the outcome of the war, reflected the determination of French armored crews fighting against overwhelming odds.
The camouflage
France entered WWII with one of the most visually complex armored camouflage systems in Europe, using multi‑color disruptive patterns rooted in WWI camouflage theory. These vibrant schemes were intentional, not decorative, and reflected France’s expectation of a slow, infantry‑centric war rather than the fast mechanized conflict that unfolded in 1940.
Renault FT at Royal Museum of the Armed Forces, Belgium. Source: Wikipedia Saint-Chamond tank. Source. Wikipedia
French armored vehicles in 1939–40 commonly featured three to five contrasting colors. Greens, browns, ochres, greys, even blues were applied in irregular patches. Many patterns included dark outlines between colors to sharpen contrast and break up the vehicle’s silhouette. This approach came directly from France’s pioneering WWI camouflage corps, which emphasized disruption over uniform blending. The goal was to confuse enemy gunners about a tank’s shape and orientation at medium distances.
Unlike Germany or Britain, France had no standardized national camouflage scheme. Factories applied their own patterns, and units often repainted vehicles in the field. This produced enormous variation. The French Army also expected tanks to operate in close support of infantry, hiding in villages, forests, and broken terrain. Multi‑tone camouflage was seen as ideal for these environments.
Hotchkiss H39 at Saumur. Source: Wikipedia SOMUA S35 at Bovington. Source: Wikipedia Char B1 bis at Saumar. Source: Wikipedia
French camouflage was effective for static or semi‑static warfare, the kind of fighting France expected. In defensive positions or slow advances, the disruptive patterns helped conceal vehicles. But in 1940, German forces fought a high‑speed, long‑range, radio‑coordinated campaign. In this context, France’s elaborate camouflage likely offered little advantage.
The Tamiya R35 kit
This kit was tooled in 2020 and has all the hallmarks of newer vintage Tamiya kits. A few sprues, crisp detail and molding, link and length tracks, and simple instructions. An excellent color guide rounds things out.
I’ve built a few of Tamiya’s relatively new-tooled light tanks: 38T, M3 Stuart, and Panzer II. Each was a blast to put together, and the R35 was no different. They are all so good, that I’ve taken to bringing them to group builds. Their assembly is easy enough that you can equally concentrate on socializing and building. I suggest you give it a try!

The build
In the first pic you can see how stress-free of a build the main hull was. A table with others, some food and drinks, and the bare construction essentials. The only tricky part about this build was the self-imposed desire to use AK Markers (more on that later). In the second pic you can see nice casting texture on the turret and main gun assembly. And in the third pic you can see a partially painted tank taking shape. Fortunately, there were no real construction issues to report. Anything encountered can be fixed with some gentle sanding or standard hobby knife work.
Group build Turret sub-assembly Build up quick
Painting with AK Interactive's Real Color Markers
This is the heart of the project: running AK Interactive's Markers through the five-tone French camouflage gauntlet. Are they the cheat code I thought they might be?
I started by color swatching the markers and mocking up a simplified pattern to see how everything looked next to one another. The color choice wasn't so much about historical accuracy as it was getting an interesting differentiation. I settled on the following:
RCM001 Rubber Black - intended for outlining, but only used for tires
RCM012 Wood Base
RCM015 RAL 6003 Olivgrun
RCM019 RAL 8012 Rotbraun Red Brown
RCM028 RAF Cockpit Grey-Green
RCM029 IJN M3 (M) Mitsubishi Interior Green
Pigma Micron Black 03 - used for outlining
Then I started to paint parts while they were still on the sprue. This is something that I don't typically do. However! Given the marker tips are relatively fat, and less able to get into the nooks and crannies that a paint brush or airbrush can, it was crucial to paint parts when their surfaces were most accessible.
The running gear is a good example. I painted the interior and exterior suspension surfaces before both halves were glued together. The main gun was also painted before it was placed in the turret. The point is, you need to think through the paint/build sequencing more than normal when using the markers. And don't worry, any touchups from removing parts from the sprue or gluing them together were a breeze.
Color swatching Painting on sprues Paint/build order matters
I used a pencil to carefully trace the camouflage pattern onto the tank. Then I filled in a few color blocks at a time. It was definitely slow work, probably slower than I thought it would be. But it was also very low fuss. Change colors? Just cap and uncap. Simple. You are literally coloring with markers as if in grade school. It was exactly the experience I was looking for! The markers also allowed me to share the hobby with my wife. She was able to help out with tracing and coloring. She was fully hooked after a few minutes!
Outlining the camouflage
A careful reader will ask what's so special about that Pigma Micron Black marker found in the initial list. A picture comparing the tip to an AK Marker tells most of the story. The Pigma Micron is more precise and firmer than the AK Marker. That allows it to outline the camouflage pattern colors with much greater control and uniformity. I did initial try using the AK Marker for outlining, but the tip thickness and softness were very difficult to work with.
Pigma Micron vs AK Marker Complex scheme
I'll end this section with my general observations and best practices for using AK's Markers.
Pros: incredibly simple to get started with; go down smooth; dry quick; can be painted with multiple coats; touchups are a breeze.
Cons: painted surfaces are easily smudged or streaked (even from brush painting); tips are too fat and soft for some applications.
Neutral: opacity varies with colors; ensure clean paint surfaces for best adhesion (both observations are standard for any paint product).
Best practices: clean surfaces ahead of painting; think about paint/build order; paint in multiple layers; handle painted surfaces carefully.
So what's the verdict? 100% give the AK Markers a try! They turned this tedious French camouflage scheme into a fun, shareable, low-fuss project. The markers are not perfect for every task, but they earned a place on my workbench. I hope the good folks at AK Interactive expand the lineup with different tip sizes and varnish options. Bravo AK!
Decals
Decals went on with my usual method which meant first giving the build a gloss varnish. I must report that my varnish of choice, Pledge Floor Care, combined with brush painting, did streak the AK Marker paint job a little. It wasn’t catastrophic by any means, but it did surprise me. So if you plan to brush paint a varnish, over AK Markers, try not to make multiple brush passes over the same area.
Once the R35 was varnished, everything went well except for one stubborn decal on the lower front hull. It just so happens to sit right on a detailed plate. I applied liberal amounts of Mark Fit Strong and elbow grease to bed it down. Ultimately, I had to touch it up a little with paint.
Decals Mark Fit Strong Stubborn decal
Weathering
I kept it simple on this build because I wanted the camouflage scheme to be the star. First I applied Tamiya's Panel Line Accent Color as a pin wash to the entire tank. Then I added AK Weathering Pencils in a very wet slurry-like form around the suspension.
Panel Line Accent Color AK Weathering Pencils Weathered running gear
Final thoughts
This build was exactly what I hoped for: easy construction, an eye-catching subject, and one fresh painting experiment. Tamiya’s R35 is already a great little kit, with the fit and engineering you’d expect from their newer armor releases. But the AK Markers are what made it memorable, especially for this time-constrained convenience-seeking modeler.
I highly recommend trying AK Interactive’s Real Color Markers, especially for small-scale subjects, bold camouflage, or projects where convenience matters. They won’t replace every brush or airbrush job, and they do require planning, but they made this R35 more approachable, relaxed, and fun than I expected. That’s enough to earn them a regular place on my bench.
Tamiya's 1/35 R35 Tamiya's 1/35 R35 Tamiya's 1/35 R35 Tamiya's 1/35 R35 Tamiya's 1/35 R35 Tamiya's 1/35 R35 Tamiya's 1/35 R35 Tamiya's 1/35 R35 Tamiya's 1/35 R35 Tamiya's 1/35 R35 Tamiya's 1/35 R35 Tamiya's 1/35 R35
Thanks for reading,
Mido
Contact the author: mido@igluemodels.com and Twitter @igluemodels


How did you paint the tracks before assembly or after it looks like you left it till the end btw i will try to do the same as i have those AK markers and that kit