Tiger 131
- Mido

- Mar 5, 2022
- 11 min read
Updated: Jun 8, 2022
The Tiger. The second build in my Panzer Series and a subject that any armor modeler worth their weight in glue will have proudly displayed on their shelf. For this build I will be modeling the world-famous Tiger 131, the only remaining Tiger tank in running condition. Just imagine traveling to The Tank Museum in Bovington, England, 1/35 Tiger in hand, and watching from the stands on Tiger Day when the 1/1 Tiger drives on by! Wow.
But first I needed a kit. And not just any kit. I needed a kit that can build into Tiger 131, one of the earlier production Tigers, and that's exactly what Tamiya's excellent Tiger 1 Early kit has in the box.

Editor's note: Choose your own content! Click here to be taken to the kit and build, or continue reading to learn about the tank's background.
Also, be sure to check out the first build in the Panzer Series, Tamiya's Panzer II A/B/C!
The Tiger I
The panzers of the Wehrmacht were among the most feared machines in the second world war. And of all the panzers, one stood above them all, the Tiger I. According to myth, that is.

The Tiger I can trace its development back to 1937 when the Henschel & Sohn company were approached to create a 30-ton heavy "durchbruchwagen", or breakthrough tank. For contrast, this was nearly double the weight of the then in development Panzer III which was to serve a similar role.

Over the next few years, the durchbruchwagen would see several design and development modifications, especially to armor and armament. But the durchbruchwagen would not progress far. Shortly after Operation Barbarossa, the invasion of Russia, German front-line forces discovered that their Panzer III and IV tanks were under-armed and armored in comparison to Russian tanks. In fact, German tank design was so behind that even the durchbruchwagen would not be sufficient to fulfill its role as a breakthrough tank. A new project was needed.
And so the durchbruchwagen and several associated projects would fold into the Vollketten 30, or chained vehicle 30-tons (VK 30), development effort. Crucially, 30-tons was now viewed as a medium tank and it was needed now. For Russian KV-1 and T-34 tank units were wasting no time tilting the battlefield against their German invaders. This "now" tank would become the Panther. But a tank was still needed for the breakthrough role. Therefore, in May 1941, the order was given to start the VK 45 program, the immediate predecessor of the Tiger. Timelines were tight; production was to start in 1942.

Two companies embarked on the VK 45 program: Henschel and Porsche. Both of these companies competed to make a chassis; while a third company, Krupp was in charge of making the turret. Porsche was so confident in their design and that they began producing hulls before a final contract was awarded. But it wasn't to be and Henschel's VK 45.01 (H2) ultimately went on to become the Tiger I. Armor enthusiasts will take note that the completed Porsche hulls didn't go to waste. They would be converted into Ferdinand/Elefants which were menacing vehicles in their own right!

The Tiger I, combined a fearsome 88mm gun derived from an anti-aircraft gun, and over 100mm of armor in select areas. Estimates suggested that it could penetrate allied armor, like the M4 Sherman, at an estimated 2,000 meters. Conversely, up-gunned Shermans had to close to approximately 600 meters for similar levels of penetration. At approximately 55 tons, it was a beast (so much for the 45 in "VK 45"). There was nothing quite like it on the battlefield. From these key characteristics alone, it is no wonder why the Tiger struck fear into allied soldiers.

But you can't get something for nothing and the bottom line is that weight was a problem and it conspired against the Tiger in many ways:
Bridges - At 55 tons, many bridges were out of the question. To effectively carry out a breakthrough role, where operations ahead of engineering units would be common, a water fording system and watertight engine was incorporated into early Tigers. This added cost and complexity, and as it would turn out, substantial engine overheating issues.
Engine and drivetrain - There is a reason why a 30-ton vehicle was considered to be a heavy tank during the initial design phases. It was the limit of mechanical propulsion at the time. And by limit, I do mean limit. Panthers (45-tons), Tiger Is (55-tons), and Tiger IIs (70-tons) all used a derivative of the same Maybach HL230 V12 petrol engine. I don't know much about engines, but I think there is a problem here.
Ground pressure - To distribute the substantial weight, an elaborate suspension system was devised. This came in the form of 48 interleaved Schachtellaufwerk road wheels and a set of tracks, that when mounted, were too wide for rail transit. Frustratingly for the tank crews, a transport-specific set of narrower tank tracks was needed. I can't imagine what the crews thought when an inner road wheel required changing.


The Tiger would first see action near Leningrad (present day Saint Petersburg) in September 1942. And while this was an important milestone for the vehicle, a more significant one had already taken place in January 1942 when the Wehrmacht was halted at the gates of Moscow. In effect, by the time the Tiger entered service, the tide of war had already turned against Germany, and the intended use-case for open-field breakthrough operations evaporated with it.

Despite Tigers rarely taking on their intended role, does not mean they were ineffective once in combat. So-called "Panzer Aces" like Michael Wittmann and Otto Carius emerged after employing their Tigers against Allied forces in ambushes and in close quarters. In skilled hands, a Tiger could dominate its locality. Online estimates vary wildly, and it is impossible to know for sure, but I have seen numbers stating 10,000 - 20,000 Allied tank kills attributed to Tigers. If the Tiger did have an approximate 10:1 kill ratio, it would certainly be worthy of its feared reputation.

Impressive as the Tiger's kills claims are, at a strategic level, the Tiger's impact on the war is hotly debated. The production run of 1,300 units meant relatively few numbers on the battlefield, and they were also extremely costly to produce. Some sources estimate that 2 to 4 Stug IIIs or Panzer IVs could be built for the cost of 1 Tiger. And this is to say nothing of the intensive logistics and maintenance trains required for field sustainment.


Where does this leave us? The Tiger was effective when in the hands of a skilled operator. But points are lost from its high acquisition and logistics cost. Was it the optimal production vehicle for the Wehrmacht at the time of design, production, and available information? I suspect no, but I'm also unsure if any vehicle could have changed the tide of the war. Did it strike fear into the enemy? It most definitely did.
Lastly, does it continue to intrigue modelers? Absolutely!
Tiger 131 features
The first thing to understand about Tiger 131 is that there are many Tiger 131s. The "131" tactical designation refers to a tank in the 1st company, 3rd platoon, with the last "1" indicating the commander's tank. The world-famous Tiger 131 was assigned to the 504th Schwere Heerespanzerabteilung (heavy tank battalion) and served in Tunisia as part of the Afrika Korps in early 1943.
Its capture has been documented in detail by The Tank Museum and I have linked an excellent video of theirs below. But to summarize their research, led by Dale Oscroft, Tiger 131 was disabled by the 2nd Battalion Sherwood Foresters on April 24, 1943 at Gueriat el Atach ("Point 174"). Notably it was the first intact Tiger to be recovered from a battlefield.

131 was welcomed to England with public parade and fanfare. The tank was so important to morale that Winston Churchill even took an interest in the vehicle. Because of its strategic value, a thorough examination of the tank took place. Ultimately, that required a full disassembly.
Unfortunately, 131 was never reassembled properly and it sat in a state of disrepair at the Tank Museum until the 2000s when it was brought back to running order, the only Tiger tank in the world to currently claim this status. Today the tank has been made famous by an appearance in the movie Fury (2014) and through various Tiger Days hosted by The Tank Museum.

With this background in mind, there are several features that I would like to represent on my model:
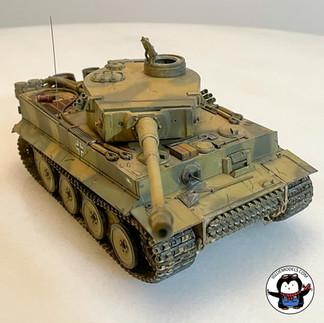
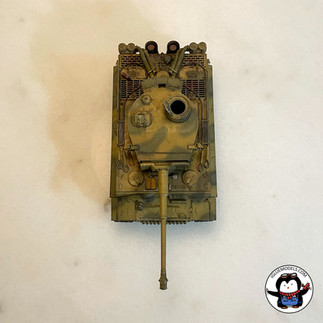
Wheels - 131 is an Early Tiger. Therefore, our kit needs to have the requisite "dish" style wheels. All 48(?) of them!
(?) Missing wheel - Photos of the disabled 131 indicate that the outer front-left wheel was missing. Sometimes crews would remove the outer front wheels to prevent the suspension from seizing up with debris, but other times a missing wheel could simply result from damage. Unfortunately, there is no photo showing the other side of that tank and the presence, or lack thereof, of the outer front-right wheel. On my tank, I will pay homage to the photo I do have, and leave off the single left wheel.
High cupola - Another feature of Early Tigers was a high commanders cupola.
Fiefel filters - Tanks sent to the desert were given additional air filtration systems. Fiefel filters were mounted on the rear hull and used vortices to separate particulate matter from ingested air.
Foot step and handle - Pictures of 131 show field modifications that include a foot step on the lower front hull and a handle on the glacis.
Camouflage - It may be difficult to see in the black and white photos, but 131 sported a two-tone camouflage pattern. The Tank Museum has painstakingly reproduced it on the 1/1 scale one, I will definitely recreate it on the 1/35 scale one.
The kit
As one of the most popular modeling subjects, countless Tiger kits are on the market. Maybe even one for every real Tiger that was produced! But they do not all represent the Early Tiger, nor are they all known to build easily.
Dragon's specific Tiger 131 kit was a real contender for this build but it was not available.
Some contemporary Tiger kits provide full interiors (one day!) and boast (?) nearly 2,000 parts (sigh).
In the end, I stuck with Tamiya's Tiger I Early kit which was tooled in 1997 according to scalemates.com. It is a simple kit, and by all accounts it will build up into a great model.
The build
How should I put this? Building an Early Tiger is about building wheels. That 1/1 scale engineer who was so concerned about ground pressure clearly had no concerns for we modelers. The nerve.
These pics show what I’m talking about. 48 glorious rubber-rimmed to-be wheels fresh from the sprue. To achieve the rubber-rimmed look, I first gave the wheels a coat of Tamiya’s XF-69 NATO Black, followed by the base color applied via circle template. After a coat of gloss varnish, Tamiya’s Black Panel Line Accent Color was used to correct any overspray.


Once the wheels were out of the way, the rest of the kit built up quickly. No fit problems to report, and nothing that a quick hit from a sanding stick couldn’t solve. The barrel didn’t even require much work. That’s why modelers love Tamiya.
For the sake of eliciting a reaction, I will make the daring modeling admittance: I did not paint any of the turret interior. Gasp. Honestly, I didn’t think that was the main purpose of this build, there wasn’t much detail for anyone to look at, and none of it would be seen anyways. Ultimately I wanted to focus on the exterior painting and weathering process.


Painting
The painting instructions provided by Tamiya call for an overall color of XF-60 Dark Yellow. Up until recently, this has been their standard color for representing German vehicles painted yellow or in Dunkelgelb (RAL 7028). However, careful research from The Tank Museum revealed that Tiger 131 actually had a two-tone scheme comprised of 2 parts Yellow-Brown (RAL 8000 ) and 1 part Gray-Green (RAL 7008). And if you are wondering, RAL stands for, here it is: Reichs-Ausschuß für Lieferbedingungen (National Committee for Delivery and Quality Assurance). They were the arbiters of color standards in Germany.
After scouring the net for RAL to Tamiya color recipes, I settled on something similar to the following:
RAL 8000
4 Parts XF-4 Yellow Green
2 Parts XF-52 Flat Earth
1 Part XF-60 Dark Yellow
RAL 7008
1 Part XF-49 Khaki
1 Part XF-51 Khaki Drab
I say similar because after testing, I adjusted the colors slightly with a drop of "this or that" "here and there". Modeling is part art...right?
Editor's note: At the time of building, Tamiya had released XF-92 Yellow-Brown (DAK 1941) which from what I can tell is meant to be RAL 8000, however it was not, and still is not, easily available to me.
I started painting with a base layer of XF-69 NATO Black. I learned from the JGSDF Type 90 build that adding white highlights under a two-tone scheme wouldn't look very good. So instead of doing that, I went straight to a layer of my RAL 8000 mixture. Then I used Silly Putty to mask off a camouflage pattern that mirrored the actual Tiger 131 before laying down RAL 7008. I added tonal variation by going over the central parts of the base camouflage scheme with lightened versions of the respective colors. Consider this a form of post-shading.


The pioneer tools were painted separately and then added to the hull prior to varnishes and weathering. This is a compromise between two schools of thought. The first believe that tools should be painted along with the rest of the hull to achieve a unified "look and feel". The second school says the tools should be completed separately for ease of painting.

Decals and Weathering
With this kit, and tanks in general, there is usually not much to say about decals. This is usually what you want and I'm happy to report that this kit was no exception. Bottom line, the supplied "131" and other unit markings went on with ease. Gloss varnish. Decals. Gloss varnish. Done.
Because this build represents a specific vehicle that was captured in battle, I knew I wanted to add some degree of weathering. And placing the vehicle in its context, Tunisia, meant that rusting and mud would probably be a no-go. But there was one exception: I wanted to add rusting to the engine exhaust shrouds which can be seen on the real Tiger 131. Here you can see how I built up multiple layers of varying colors to create a rusted base. Nothing fancy or carefully applied. Just multiple thin layers of Vallejo paints. I finished the look with rust colored pigments and Tamiya Panel Line Accent Colors.


Next, I added some visual interest to the hull with chips and scratches and applied a pin wash to the panel lines and raised details.


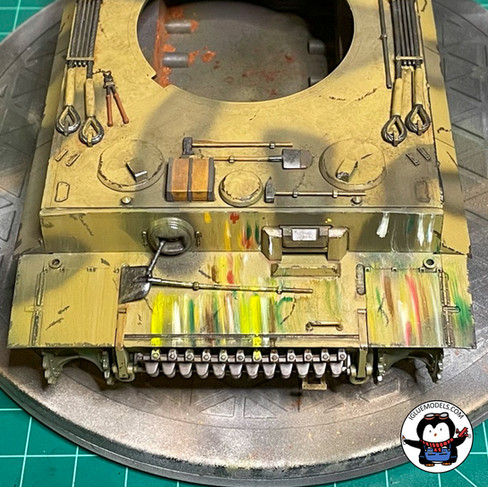


Then I used an oil dot filter for an extra layer of grime and tonal variation. Note how I did this with the pioneer tools fixed to the hull.
I finished off the weathering with sand and dust colored pigments via a water-based slurry. Previous pigment slurries of mine used mineral spirits as the medium. I was hoping that by using water I could achieve a similar effect albeit with less chemicals. However, I noticed that the surface tension of water is far higher than mineral spirits and that the slurry didn't flow into the nooks and crannies the way I wanted it to. In the future, I think I will return to mineral spirits. Once the slurry dried, I used a brush to wipe away the excess.
Final thoughts
This was a great project. First, I got to go down two historical rabbit holes: the genesis of Tigers and the specifics of Tiger 131. Second, I was able to experiment with a number of weathering techniques such as rusting the engine exhausts and working with pigments. And third, I was able to present this tank as a gift to a fellow Tiger lover. This last bit is particularly important. It means this Tiger won't end up on my shelf and therefore, I still won't be worth my weight in glue. Guess I'll have to build another!


Let me know in the comments if you think I captured the look of the world-famous Tiger 131!
Thanks for reading,
Mido
Sources, information, and other useful links
Contact the author: mido@igluemodels.com or on IG and Twitter @igluemodels


What's silly putty and what is its function?
Love the use of silly putty, gonna use it on my 131, thanks for a great article
Brilliant stuff, both the article and the build. On with one at the moment, hopefully it will come out somewhere half as good as yours!