1/700 Oliver Hazard Perry-class
- Mido

- Dec 17, 2022
- 9 min read
Updated: May 2, 2023
This ship is and isn't part of the modern ship series. Let me explain. It isn't part of the modern ship series because the US Navy retired its last-in-class-to-serve, USS Simpson (FFG 56) in 2015. But it is part of the modern ship series because Oliver Hazard Perry-class ships and their derivatives still serve with navies across the globe. This last part is what tickled my curiosity: why are they still in service, and how many navies operate them? I had to find out more, and the best way for me to do that was to build!
Editor's note: Choose your own content! Click here to be taken to the kit and build, or continue reading to learn about the class and ship's background.

The class
The Oliver Hazard Perry-class traces back to Admiral Elmo Zumwalt Jr. and his 1970s vision of building a navy that featured a high-low mix of vessels. The high end was to boast lower-density high-cost assets like destroyers and cruisers, while the low end was to feature easily producible and inexpensive frigates like the Oliver Hazard Perry-class and gunboats of the Pegasus-class.

At the time, the principal threat to the US Navy was conflict with the Soviet Union and other Warsaw Pact nations on the European continent. Despite the US maintaining a large force presence on the continent, it was always believed that reinforcements of men and material would need to come from the US mainland. Therefore, the Perry-class was envisioned as an ocean-going escort vessel—think merchant convoys and assault groups transiting the Atlantic—with a focus on anti-aircraft and anti-submarine warfare.
Editor's note: For a narrative and cinematic sense of what this might have looked like, the Perry-class ship, USS Reuben James (FFG-57), featured heavily in Tom Clancy's Red Storm Rising and The Hunt for Red October.

To achieve its stated mission, the Perry-class was initially armed with a Mk 13 Missile Launcher that could fire SM-1MR anti-aircraft missiles or Harpoon anti-ship missiles, two triple Mark 32 anti-submarine torpedo tubes, one OTO Melara 76mm/62 caliber gun, and one 20mm Phalanx CIWS. Supporting aviation facilities could also embark a pair of helicopters for anti-submarine warfare, reconnaissance, or logistics. For targeting, the ship relied on an AN/SPS-49 air-search radar and the AN/SPS-55 surface-search radar.
Propulsion took the form of two gas turbines that powered one propeller. From this arrangement, the ship could travel 4,500 nautical miles at 20 knots or attain speeds up to 30 knots. Because the gas turbines were more automated than previous propulsion units, the Perry-class was able to embark with a relatively modest crew size of 176. All else equal, a smaller crew means a smaller operating budget which is right in line Zumwalt's low-end class of ships philosophy.

True to Zumwalt's desire to have an easily producible vessel, US shipyards churned out 55 of 71 vessels of the Perry-class over a 12 year period. Beginning with USS Oliver Hazard Perry (FFG-7) in 1977, and ending with USS Ingraham (FFG-61) in 1989, the US Navy operated 51 hulls. If you're following the numbers closely, that leaves four ships produced by the US but destined for foreign navies, Australia, and another 16 ships produced outside of the US for local service: two in Australia (Adelaide-class), six in Spain (Santa Maria-class), and eight in Taiwan (Cheng Kung-class). If this multi-national production run wasn't impressive enough, decommissioned US Navy Perry-class vessels have found additional service with Bahrain, Chile, Egypt, Pakistan, Poland, and Turkey.

When the US Navy finally decommissioned the Perry-class in 2015, it was left without a proper frigate. This situation became increasingly acute because the littoral combat ships of the Freedom and Independence-class have proven unable to match the capabilities or value of the Perrys. Since their decommissioning, periodic mentions of Perry-class reactivation have captured news cycles despite being consistently dispelled by cost. And as a final testament to the Perry-class' value-add to the US Navy, a future frigate program, the Constellation-class, is under development. Time will tell if the Constellation-class is successful, but if the US Navy incorporates the best characteristics of the Perry's, smoother waters should be on the horizon.
The ship
USS Simpson (FFG-56) was built by bath Iron Works and commissioned on September, 21 1985. She was named for Rear Admiral Rodger W. Simpson who served with distinction in World War II.

Over Simpson's 30-year service, the highlights would come quickly. Shortly after commissioning, Simpson would go on to join search and rescue efforts for the Challenger shuttle disaster in 1986. Then on her first overseas deployment in 1988, Simpson found herself in the middle of Operation Praying Mantis. Praying Mantis was the US retaliatory action against the Islamic Republic of Iran for the mining of fellow Perry-class vessel USS Samuel B. Roberts (FFG-58) which injured 69 and almost sank the ship. During this action, Simpson destroyed Iranian naval intelligence facilities, and helped sink a missile patrol boat of the Iranian navy Joshan (P225).

Her remaining years were spent patrolling the Persian Gulf, participating in various enforcement actions in the Mediterranean, Haiti, and other locales; conducting anti-drug smuggling activities in the Pacific; and anti-piracy operations off the coast of Africa. When Simpson was finally decommissioned on September, 29 2015, she had literally been everywhere and done everything the Navy could ask.
So to the crew of the Simpson and the entire Perry-class: BRAVO ZULU!

The kit
Dragon's 1/700 USS Ingraham kit was released in 2007. According to Scalemates.com it is the latest in a line that traces back to Pit-Road’s 1990 Perry-class release. The kit is molded on 3 grey sprues, includes a photoetch fret, and contains decals for several ships including Simpson. As a bonus, the kit comes with a Pegasus-class hydrofoil! If you're worried that the small scale won't have much modeling, don't be!

The build
I’ve discussed the big picture pros and cons of building in 1/700 scale before, and this kit proved no exception. In terms of kit-specifics, two build challenges should be noted from the photo below. First is the large seam that formed between the upper and lower hull. You can see that I tried to fill it using my standard Vallejo Putty and Tamiya Surface Primer technique.

But unfortunately, when I primed the kit, I learned that I did a terrible job sanding everything smooth. Take this as a reminder that priming a build not only provides a uniform surface to paint on, but also reveals imperfections in construction.


The sanding job was so bad that I had to start over, but only after I upgraded my sanding arsenal with Tamiya’s Sanding Sponges. The sponges come in a variety of grits, and work great on complex curved surfaces because they "flex and conform" to rather than "fight" the mold.
Photoetch was the second kit-specific build challenge. To be fair, all the photoetch in the kit is strictly optional, and this probably doesn't even qualify as kit-specific. But I should note that the main radar tower was very fiddley and the railings, for which I devote a section below, were a real pain!
Painting
This build is about celebrating the storied career of the Perry-class. I can’t imagine a better way to do this than to present a well-worn subject that has “been everywhere and done everything” the navy has asked. This means texture in base painting and weathering.
I kicked things off with a round of pre-shading. Conveniently, this meant laying down highly diluted Tamiya Flat White (XF-2) on the already black surface. And a suggestion for the cheaters out there: if you use a black base, all you need to do for the perfect waterline is to mask it from the beginning! I think Tamiya's 1mm tape works great at this scale.


Once I had the white highlights on, I proceeded as follows:
Tape the upper hull and superstructure
Paint a custom custom mixture of Vallejo Dark Red (70.946), Flat Red (70.957), and Amaranth Red (70.829) to simulate the anti-fouling red keel
Mask the keel
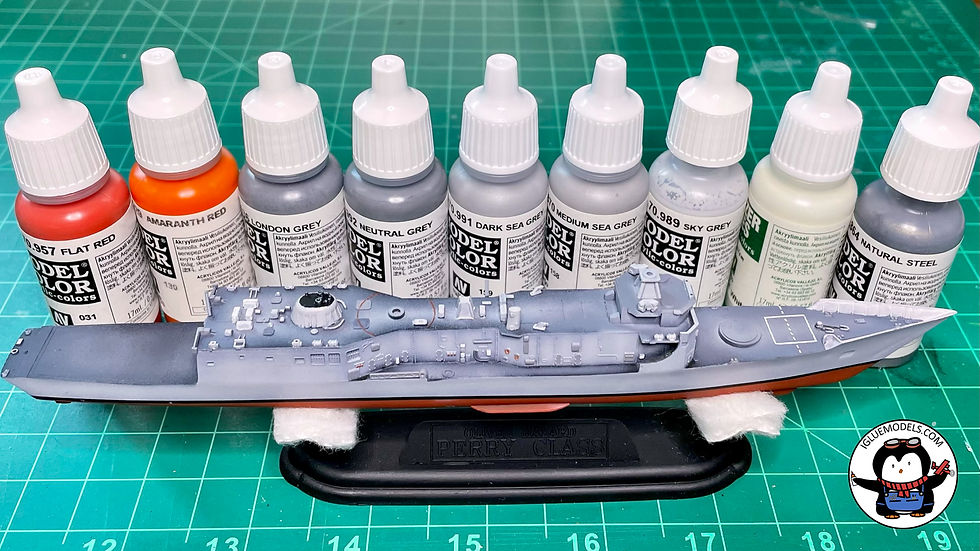
Paint the vertical surfaces Vallejo Sky Grey (70.989)
Mask the vertical surfaces
Paint the horizontal decking Vallejo London Grey (70.836)
Paint the flight deck Vallejo German Grey (70.995)
To finish things up, I took out some fine brushes and hand painted various bits, doo-dads, and gizmos all manner of this grey, that grey, and other grey. It is slow going, but can be quite zen! Plus, the results are always worth it.
Working with photoetch or working in hell?
This was my first ship build that came with a significant amount of photoetch railing. Railings are great because they provide a lot of extra detail, but they are extremely delicate. When removing railings from the fret, care should be to taken to ensure minimal burrs. That's because the railings don’t hold up well to the sanding or snipping tools used during cleanup.

Once a piece is detached and cleaned, the trouble quickly becomes placement and gluing. My only experience thus far is with fine tweezers which can lead to problems. For example, the constant pressure on tweezers can make your hand grow tired, tremble, or more tragically, warp the piece of railing you are holding.
Editor's note: As an alternative to tweezers, I hear people use wax pencils with just the right amount of adhesive to pick up a part and maneuver it into position, but not so much adhesive that the part will permanently stick to the wax. Intriguing...
Then, once a part is in position, how do you get it to stay? White glue and CA glue are common choices, but there are pros and cons to each:
White glue takes long to set and is usually too thick out of the bottle. You can thin it with water
CA glue can be unforgiving because it is very easy to glue two things together that you don't want glued together, e.g., your fingers! The benefit of CA is that different viscosities and set times are available
I opted for CA glue but at some point during the process I got tired of gluing my fingers together or the ship to my fingers. I asked my hobby group for advice and one of them recommended UV glue which is a resin that only cures under UV light. This property solves a big problem: setting a part only when you want to set it. Additionally, the glue has a medium viscosity, so in some cases a part can be held in place temporarily without pesky tweezers. Like white glue and CA glue, UV glue dries clear. It all sounded compelling.


After using the UV glue on a few pieces of railing, I realized that this glue was also no cure-all. It turns out that the light can be cumbersome to work with if you still need tweezers to hold a part in place.
Where does this all leave us? I'm afraid nowhere conclusive. Instead, I offer that gluing is an art more than a prescribed science. Experimentation is the name of the game, and don't be afraid to use the entirety of your arsenal. As I worked, I realized I fell into the groove of using the tiniest amount of viscous CA glue or UV glue to get an initial bond, and followed it up with thin CA for a more permanent fixture.
Enough about photoetch.
Rigging
Rather than write about more hell, I'm going to gloss over the details that go into rigging. Don't worry, rigging will get the pixels it deserves in another ship post. The point is, like everything else in this scale, rigging is difficult. The right tools can make it easier, but the process will most likely test your patience. Here you can see a bevy of kit, much of which overlaps with photoetch work.

I use AK's Elastic Rigging Bobbin (Hyper-thin and Mega-thin) and find it relatively easy to achieve good tension on the lines. The difficulty is in gluing. The fiber is so thin that air currents can blow it out of position. Don't breathe. Be a sniper.
After a little experimentation I found the UV glue to be helpful. Chiefly, you can dip the fiber in the glue and let the glue's natural adhesion hold the fiber to the ship while you ready the UV light.
Finishing
I want my Simpson to present as a well-worn member of the Perry-class. To that end, it was time to get rusting. To start, I applied several Vallejo rust colors with a very light hand. Remember, you can always add more rust, dirt and grime, but it is hard to take it away.

When I was happy with the rusting, I turned to an oil pin wash and oil dot filter. For the pin wash, I brewed up a mix of Winsor & Newton's Winton Oil Colour and thinned it with Gamblin's Gamsol mineral spirits. This is delicate work, but as long as you go slow there shouldn't be many issues because oil paints are generally forgiving. In contrast to the targeted nature of the pin wash, I used the dot filter technique on larger vertical and horizontal surfaces. This too is a forgiving process as long as you don't put a heaping pile of oil paint on the kit. Less is more, and certainly so at 1/700 scale.

After the oil filter had dried for several days, I used a soft brush to work in some pigments. I reasoned that near-white pigments could approximate dried sea salts and darker ones, especially greens, could approximate marine grime. Note the extremely precarious drydock!


Finally, I made some flags that represent each country where the Perry-class has found service. The flags, printed on standard white paper, were fixed to the mast rigging with the smallest amount of white glue.
Final thoughts
When I set out on this build, I did not anticipate how long it would take. Everything was extraordinarily tedious and required the utmost precision. Ultimately, I think this is OK because I can feel skills developing. When I switch to larger scales, say a 1/35 tank or a 1/48 plane, things feel much more forgiving. That 1mm glue-blob in 1/700 that represents a 1M disaster is only a 3-5cm "something" in larger scales and can be weathered away easily.
Am I happy with the result?
Heck yes I am, and I am darn proud to share it with all of you!


Thanks for reading,
Mido
Contact the author: mido@igluemodels.com or on IG and Twitter @igluemodels
Sources, information, and other useful links


Comments