1/48 Wildcat Engines
- Mido

- Feb 14, 2023
- 6 min read
Editor's note: This post is part of a series discussing 1/48 Wildcats by Tamiya (1994), HobbyBoss (2007), and Eduard (2022) from unboxing to final weathering. Along the way, I'll present an honest opinion of each kit and share a variety of tips, tricks, and techniques. Catch up with the latest post here where I discuss all things cockpit!

The engine
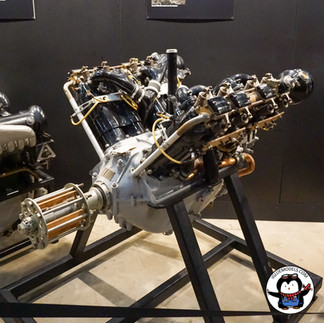
Pratt & Whitney's R-1830 Twin Wasp is often cited as the most widely manufactured aircraft engine of all time. Over 170,000 found their way into legendary aircraft like Consolidated's B-24 Liberator, Douglas' C-47 Skytrain, and Grumman's F4F Wildcat. Here's how it happened.
At the conclusion of World War I, aeronautical propulsion was at a tipping point. The commonplace air-cooled rotary engines of the time were at design limits. And while more performant inline and V-engines existed, they required liquid cooling systems that added weight and complexity to already fickle aircraft. The third engine category of the day, stationary, or radial engines, showed promise, but were hampered by cooling issues of their own.


With radial engines, a large face is exposed to moving air from the propeller. While this airflow serves to cool the engine, it also creates a large drag penalty. To overcome the drag penalty, the engine needs more power, which creates more heat, which requires a larger engine face, and on and on the cycle goes. To break that cycle back in the 1910s, advancements in metallurgy and heat dissipation technologies were needed.
Industry and other interested parties moved quickly to develop the interrelated cooling technologies. By 1921, the US Navy concluded that radials were ready to power their next generation of aircraft. Then in 1925, Pratt & Whitney entered the picture when former Wright Aeronautical-executives Frederick Rentschler and others set out on their own to focus on radial engine design and development. Their first engine, the single-row 9-cylinder R-1340 Wasp, was a hit with none other than the US Navy. Over time, more formats to increase power and performance were demanded from it. And so the famed Wasp series was born.

In general, to get more power out of an internal combustion engine, cylinder size can increase, or the number of cylinders can increase. Larger cylinders can lead to more wear and tear during operation. Therefore, adding more of the same size cylinders may be desired. But as with everything in aviation, there are trade-offs to consider. For example, 1) more cylinders can be added which may enlarge the engine face which can alter the form-factor of the aircraft, or 2) another row of cylinders can be added which comes with the challenge of how to cool them.
In 1928 Pratt & Whitney chose the second option and began experimenting on the R-1830 Twin Wasp. It was a radial engine that features two, hence "twin", rows of 7 cylinders each. The cooling issues were solved in part with highly inductive aluminum radiator caps and baffles to improve airflow to the rear engine face. Cylinders were also made smaller than on the single row Wasps which helped with operational longevity. Full rate production began in 1932 and didn't stop until 1951.


Today, examples of the Twin Wasp, like the R-2000 (derived from the R-1830) shown above, can be seen in a number of museums. But more impressively, they can be seen zipping through the skies on restored warbirds and in operation on Douglas DC-3s, the civilian version of the C-47 Skytrain.
Kit observations
In the picture below, we can see the engine parts for Tamiya (top), HobbyBoss (middle), and Eduard's (bottom). From the pieces and subsequent build, it is clear to me that no single kit provides all the features I want. I emphasize "I" because I am assessing "what looks cool" and not historical accuracy.

Tamiya's F4F-4 Wildcat - While it has the fewest number of parts, there is a key detail not found on any other kit. If you look closely, you will notice ignition wires molded onto the front cylinders. This feature gets good marks from me because I don't plan on adding aftermarket ignition wiring. However those who plan to dabble in the aftermarket might find this molding inconvenient. Curiously, the wire molding is only found on the front row of cylinders. I prefer Tamiya's rear engine case molding to HobbyBoss's offering but not to Eduard's. Lastly, assembly went together without issue.
HobbyBoss's FM-1 Wildcat - At first glance, HobbyBoss offers an improvement over Tamiya's offering due to the independent cylinder rows, robust engine rod molding, and additional front-facing engine case details. But once assembly started, it was clear that parts did not fit well.
Eduard's F4F-3 Wildcat - I liked the cylinder molding the best and enjoyed that the front row has a separate engine rod piece. Keeping these pieces separate greatly simplifies the painting process. The rear engine case is my favorite, but the front engine case lacks the ignition wiring head accesorization of HobbyBoss's. The complete absence of ignition wiring detail, among an otherwise great mold, makes me think Eduard is planning for people to use their aftermarket wiring. Lastly fit was great as you would expect.
Painting and weathering
Building three of the same engines doesn't mean I wanted to paint them or weather them the same way. Remember, part of modeling is about experimentation, and part of this blog is about sharing those experiments with you! So here are three-ish different ways of preparation.
The engine crank case was painted the same way for all the kits. I started by airbrushing a pre-thinned bottle of Tamiya's NATO Black (XF-69). Then I hand painted Vallejo's Luftwaffe Uniform WWII (70.816) and picked out the nut and bolt details with Tamiya's Chrome Silver (X-11). I used Vallejo's Gloss Varnish (70.510) to seal everything in.

Painting diverges for the cylinders and rear engine case. I hand brushed Tamiya paints for the Tamiya and HobbyBoss kits, but I decided to use an assortment of Vallejo paint for the Eduard kit. The only reason for this was to see the differences in the metallic paint lines. The end results show minor color differences, but I don't think there is enough variation to worry about which paints are used. Also note that visual interest was my ultimate painting guide and not a technical manual or copious amounts of reference photos. Point is, paint the engine with whatever, and however you want. If you aren't convinced by this, just remember that the majority of the engine will be shrouded by the cowling.


Weathering the three engines involved more divergence. I used Tamiya's Panel Line Accent Color for Tamiya's kit, Vallejo's Game Wash products for the HobbyBoss engine, and Winsor & Newton's Winton Oil Colour for Eduard's engine. Again, this is about experimentation, and importantly testing out enamel, acrylic, and oils respectively. Think of this as a horse race of sorts, or in this case, a "cat" race!
Tamiya's F4F-4 Wildcat - Engines are full of nooks and crannies which makes Tamiya's Panel Line Accent Color, or any enamel-based wash, a great medium to consider. Just wet the brush, touch the crevices, and then let everything flow. Once the wash has set for a little, wipe away the excess with some cotton buds. Done. However one downside of working with enamel products is their smell. Increasingly, I do not enjoy it. Perhaps there is a different path.
HobbyBoss's FM-1 Wildcat - In general, I have developed an aversion to acrylic washes because they do not allow for much correction. Once it dries, it is dried. No reactivation. Now, a long time ago I read about a sludge wash in Finescale Modeler magazine. From memory, it involved adding dish soap to acrylic paints to form a "sludge" that can be slathered into a model's recesses and then easily wiped away. Well, it was a bit too long ago, and I forgot the exact details of the formula. I tried it here, but I did not get the desired result. Instead, I ended up with something more like a normal acrylic wash which fortunately did not ruin the engine.
Eduard's F4F-3 Wildcat - I find oil paints to be the most versatile weathering medium. They can create dot filters, pin washes, and streaking with ease. They dry slowly, have excellent blending capabilities and in my opinion, offer the best control. I liked the results from this simple black and brown wash the best, and the best part is the low odor nature of the oil paints.


Final thoughts
Three engines, three different kits, three different ways. In terms of molding, I thought that each kit had something to offer. I liked the ignition wiring on Tamiya's kit, the crank case detail on HobbyBoss's kit, and the overall presentation of Eduard's. In terms of assembly, Tamiya and Eduard went together well, but HobbyBoss had some real problems. In terms of price, Tamiya and HobbyBoss are the near-peers, while Eduard is at a premium price point. Therefore, if you are on a budget, I would opt for Tamiya over HobbyBoss, but I am indifferent between Tamiya and Eduard's offering.
I didn't find the choice of paints to be particularly important, especially given everything will get tucked into the engine cowling. On the wash side, I enjoyed the use of, and the overall effects of the oil paints the best. I find the oil paints to be the most flexible and I appreciate that they are low odor.
So here they are! What do you think? Let me know in the comments!


Thanks for reading,
Mido
Contact the author: mido@igluemodels.com or on IG and Twitter @igluemodels
Sources, information, and other useful links


Comments